
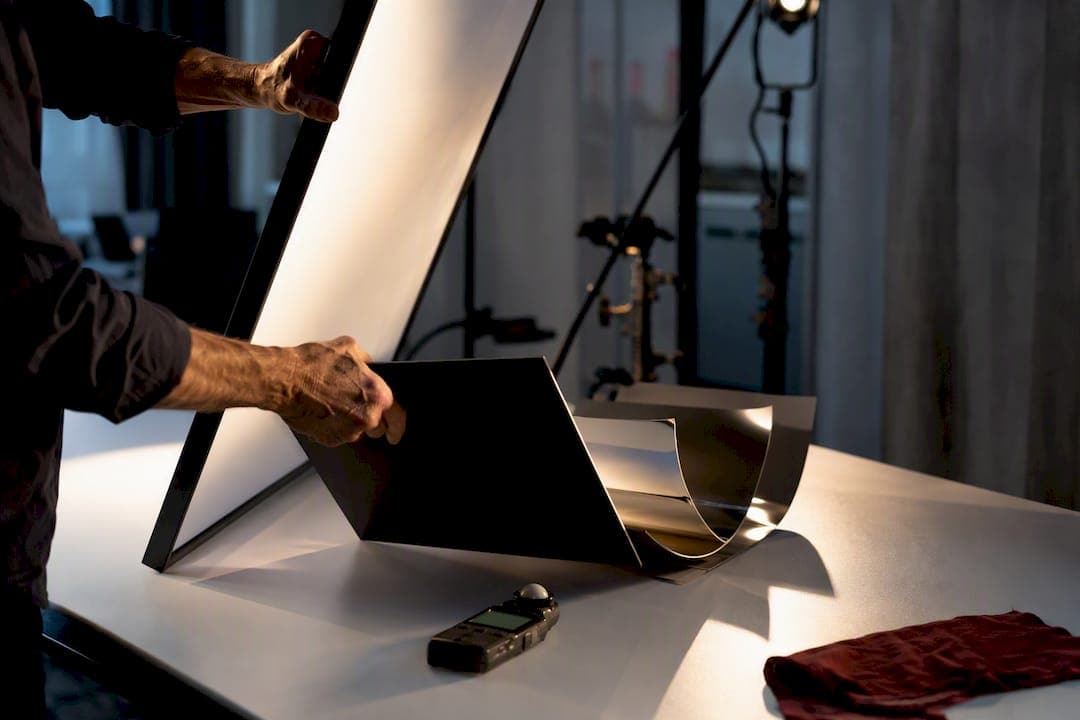
Control what the object sees, not how bright you make it. Reflective product photography comes down to designing what a bottle, watch, or glass reflects using large diffused light sources and black cards to shape the edges, then confirming the result with small angle changes. This approach has been built over decades of Manhattan studio work. What follows are the setups, the physics, and the production checklist that make it repeatable.
TL;DR:
- Large diffused light sources and black cards are essential to shape reflections and prevent hotspots in reflective product photography.
- Small lighting details, angles, and geometric adjustments have a far greater impact on reflections than simply increasing light output or adding more fixtures.
- For multiple shiny surfaces in one shot, prioritize lighting the dominant object first and use local cards to adjust smaller items without disrupting the main setup.
- Retouching should focus on minor dust, hotspots, and stray reflections, made easier by shooting clean and controlling reflections on set.
- Frequent use of foam core, black flags, and a systematic workflow reduces retouching time and improves consistency across large product catalogs.
Table of Contents
- Reflective Product Photography Setups You Can Shoot Today
- Why Reflections Land Where They Do
- Where to Place Softboxes, Bounce Cards, and Black Flags
- A Faster On-Set Workflow for Shiny Products
- Recipes for Perfume Bottles, Watches, Jewelry, and Glass
- What Retouching Can Fix and What It Can’t
- Real Studio Lessons From Reflective Product Shoots
- Handling Several Reflective Surfaces in One Frame
- Picking a Background That Works With the Reflection, Not Against It
- Creative Lighting Setups for Dramatic Reflections
- Staying Safe Around High-Output Studio Lighting
- When to Book a Studio Day vs. Handle It Yourself
- Ken Jones Photography for Product and E-Commerce Work
- Primary Sources and Further Reading
- Sources
- FAQ
Reflective Product Photography Setups You Can Shoot Today
Most reflective product photography problems get solved with five setups, not fifty. Each one below has shown up on actual production days at FultonStudio, and each has a version that works with strobes or continuous LED.
- One-light side-scrape. A 24×36 softbox positioned at roughly 30 to 45 degrees off-axis, about two to three feet from the product, throws a raking highlight that reveals texture without blowing out the surface. Add a white foam-core reflector opposite the softbox to fill the shadow side without creating a second hot reflection.
- Backlit bottle outline. For perfume and beauty bottles, place a diffusion panel directly behind the product, powered just bright enough to rim the glass without blowing through the label. A small white bounce card in front, angled up from below, keeps the label legible while the backlight defines the shape.
- Dual strip lights for watches. Two narrow strip softboxes flanking the watch face create crisp, parallel edge lines on the bezel and bracelet. Black flags positioned just outside the frame on either side cut stray reflections from the softbox edges themselves, which is where most watch shots go wrong.
- Light cone or diffusion tent for jewelry. Wrapping small reflective pieces in continuous 360-degree diffusion turns messy room reflections into a clean, even gradient across the surface. This setup alone can save hours of spot retouching on a ring or bracelet shoot.
- Overhead conical softbox for flat-lays. A large softbox mounted directly above and slightly forward of the camera lights flat-lay products evenly, but check your camera angle carefully. Shoot too straight down and you will see the lens itself reflected in glossy packaging.
Pro Tip: Build the light first, then move the product a quarter inch at a time while checking the live view. Small object shifts fix reflection problems faster than adding or removing light.
The three mistakes that show up most often on set: lighting the product instead of lighting what the product reflects, using a light source too small for the surface curve, and forgetting to check the reflection at full aperture before locking the tripod down.
Why Reflections Land Where They Do
Every reflection you see in a shiny surface obeys one rule: the angle of incidence equals the angle of reflection. Light bounces off a mirror-like surface at the same angle it arrived, which means you can predict exactly where a hotspot will land just by tracing that angle from your light source through the surface to your lens. Photographers call this the family of angles, and once you can see it in your head, glare stops feeling random.
Source size controls what that reflection looks like once it lands. A large diffused source produces a soft gradient that reads as a smooth, luxury-grade highlight. A small hard light produces a tight, blown hotspot that usually needs retouching to tame. Foam board and diffusion panels consistently outperform bare strobes for this reason on curved reflective surfaces.
When something goes wrong, run this three-step check:
- Find the offending reflection. Look through the viewfinder or on tethered capture, not just with your eyes at the light stand.
- Move the light or the camera, not the power output. Reflections are a geometry problem first.
- Test, then repeat until the highlight sits where you want it, checking at the actual shooting aperture.
Polarizing filters help with some reflections, particularly on glass and certain plastics, but they have real limits. A polarizer will not do much against metallic reflections, since those are not polarized light the same way glare off glass or water is, and every stop of polarization costs you light you have to make up elsewhere.
Where to Place Softboxes, Bounce Cards, and Black Flags
Large softboxes and diffusion panels are the default for a reason. For tabletop products, a 24×36 or 36×48 softbox roughly two to three feet away gives you a soft, controllable gradient. For larger items like handbags or footwear, step up to a 4×6 foot panel or a full diffusion frame so the light wraps enough of the curve to avoid a visible seam between lit and unlit areas.
White bounce cards do the quiet work of lifting shadow detail and adding a second, softer highlight ribbon exactly where you place them. Foam core, white side out, positioned just outside frame at a shallow angle, is often all you need. Move it closer for a brighter fill, farther for a subtler one.
Black flags do the opposite job, and they matter just as much. Negative fill placed close to the product and just out of frame creates a crisp, dark edge that separates the product from its background and reads as higher quality, especially on chrome and polished metal. Skipping black flags is the single most common reason a “clean” product shot still looks flat.
- Use white cards to build form and soften transitions.
- Use black flags to carve edges and add contrast where two reflective surfaces meet.
- Reach for a light cone or tent when you need even wraparound light fast, rather than building a four-light rig from scratch for a single ring or pendant.
Pro Tip: Keep a stack of foam core in white, black, and gray within arm’s reach at all times. Swapping a card takes ten seconds. Rebuilding a light takes ten minutes.
A Faster On-Set Workflow for Shiny Products
Reflective products punish sloppy sequencing more than almost any other category. Skip a step here and you pay for it later in retouching.
- Clean before anything else. Lint-free cloths, cotton gloves, and a rocket blower handle dust and fingerprints. Inspect under raking light, not straight-on, because that is the angle that will show every smudge in the final shot.
- Set the tripod and lock your base exposure before adding any modifiers. This gives you a stable reference point as you build the lighting.
- Add your key light first, then bring in bounce cards and black flags one at a time, checking the effect of each addition rather than stacking them all at once.
- Make small angle tweaks to the product or camera rather than rebuilding the lighting from scratch.
- Capture test frames and review at 100 percent zoom for hotspots, dust, or stray reflections before moving to the next SKU.
On camera settings, f/8 to f/11 is the sweet spot for most tabletop reflective work, giving you enough depth of field without diffraction softness. Sync your strobes properly and keep ISO as low as your light output allows, since noise shows up brutally on smooth chrome and glass. Protect your highlights by slightly underexposing rather than overexposing. You can recover shadow detail in post far more easily than you can rebuild a blown-out highlight on a bottle cap.
Tethering to a laptop with a consistent naming convention, SKU number first, angle second, sounds like a small thing until you are batch retouching 200 images and trying to figure out which “IMG_4471” belongs to which product.
Recipes for Perfume Bottles, Watches, Jewelry, and Glass
Different reflective materials fight you in different ways, so a one-size-fits-all lighting recipe rarely works across a full product catalog.
Perfume and beauty bottles respond well to a backlight for shape, a side softbox for dimension, and a clear or frosted acrylic base to keep the bottle looking like it is floating rather than sitting on a visible surface. Pure white backgrounds are the trap here. Push your exposure just enough to keep the white clean without letting it bleed into the bottle’s edge and eat your outline.
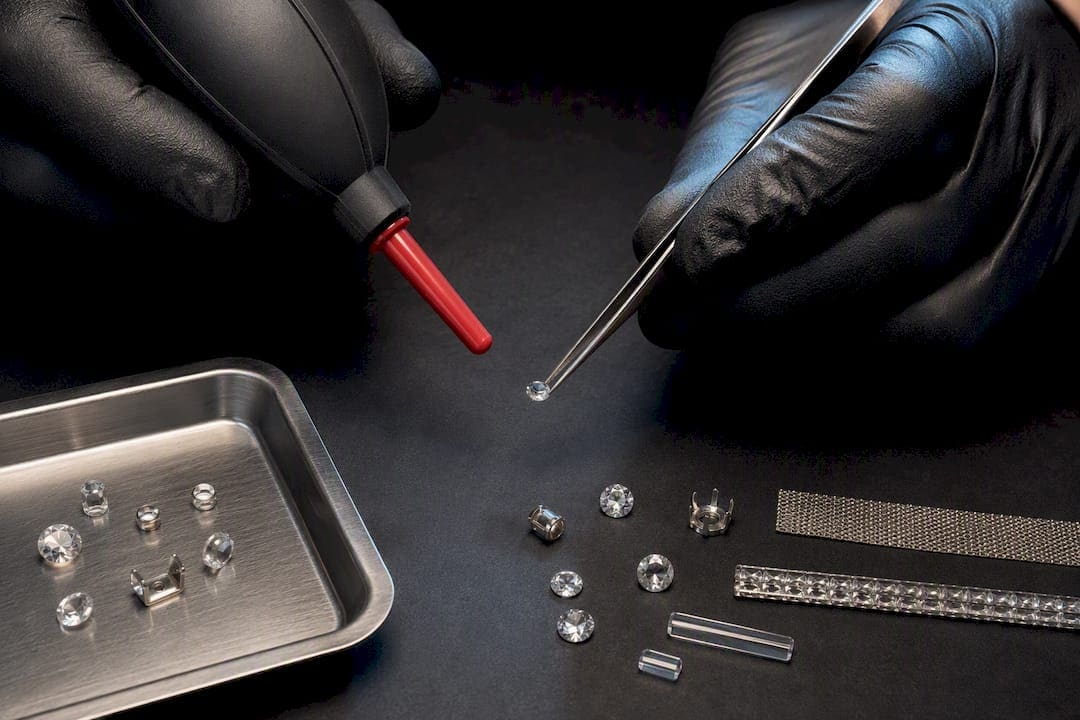
Watches and jewelry need narrow strip lights for perimeter highlights and tight black flags to keep those highlights from spreading into a smear across the bezel. Gems need a micro-cleaning protocol of their own. A single dust speck on a diamond becomes an expensive retouching job, so keep tweezers and a blower within reach every time you swap stones or straps. Decide up front whether you want maximum sparkle or clean edge lines. Chasing both at once usually means neither one looks its best.
Glassware photographs best with rim and backlight to reveal the profile, plus white cards positioned to catch interior highlights inside the glass itself. Avoid front-facing light sources almost entirely. They tend to flatten the glass and erase the very transparency that makes it interesting.
Mixed-material products, a metal-and-leather watch, a glass bottle with a metallic cap, force you to prioritize. Design your reflections to serve whichever surface carries the brand information, usually a label or logo, even if that means the secondary material looks slightly less dramatic.
| Product type | Primary technique | Watch for |
|---|---|---|
| Perfume/beauty bottles | Backlight + side softbox + acrylic base | Blown white backgrounds |
| Watches | Dual strip lights + tight black flags | Cloning-heavy bezel reflections |
| Jewelry | Light cone/tent + micro-cleaning | Dust on stones, over-sparkle |
| Glassware | Rim/backlight + interior white cards | Front light flattening transparency |
| Mixed materials | Prioritize the branded surface | Trying to perfect every material equally |
What Retouching Can Fix and What It Can’t
Even a well-lit reflective product usually needs some retouching. Tiny hotspots, dust, fingerprints, and one or two stray reflections are the normal residue of a careful shoot, not a sign you did something wrong. The realistic goal on set is minimizing that list, not eliminating it.
A sensible retouch order runs cleanup first, then highlight control, then compositing if you are combining plates, then masking or clipping paths last. Doing it out of order means redoing earlier work after a later step changes the image.
- Shoot clean edge lines on set so retouching does not have to rebuild them from scratch.
- Keep background reflections consistent across a batch so retouchers can apply one action to dozens of images instead of hand-fixing each one.
- Capture separate exposure plates for tricky highlights when a single frame cannot hold both the shadow and highlight detail.
Good on-set control routinely cuts retouch time by more than half compared to a rushed shoot that leaves everything for post. That difference adds up fast across a 300-SKU catalog.
Real Studio Lessons From Reflective Product Shoots
A cosmetics client once brought in a frosted glass bottle that looked perfect on the light stand and dead flat in every frame. The fix wasn’t more light. It was pulling the key softbox back eighteen inches and letting the gradient do the work instead of the intensity.
That shoot cost us an extra hour we hadn’t budgeted, and it taught the whole crew to test gradient before power on frosted glass. On a separate watch campaign, a single black flag placed tight against the bezel’s edge saved what would have been thirty minutes of cloning per image, multiplied across sixty SKUs.
Keep your cable runs organized and your card swaps assigned to one person on busier days. A four-person crew moves twice as fast when nobody is hunting for the black flag someone else set down.
Pro Tip: Assign one assistant to modifiers only. On a 60-SKU day, that single role change can be the difference between finishing on time and running into overtime.
See more finished examples in the product and e-commerce gallery.
Handling Several Reflective Surfaces in One Frame
Group shots with multiple shiny products, a watch next to a bottle, a set of glassware, multiply your reflection problems instead of adding them. Each surface reflects the others as well as your lights, which means moving one card to fix Object A can break the reflection on Object B.
The most reliable approach is to build your lighting for the tallest or most dominant object first, then adjust smaller pieces around it using local cards rather than repositioning your main lights. A small hand-held white card angled toward just one product can add a highlight to that piece without disturbing anything else in frame.
Shooting on a slight turntable or lazy Susan lets you test several rotations quickly without rebuilding the whole setup, which matters when you are trying to find the one angle where three different metals all catch light cleanly. Watch for cross-reflections specifically, where one product’s edge shows up as a ghost line inside a neighboring surface. These are easy to miss on a small screen and obvious once you view the file at full size.
When surfaces genuinely conflict, shoot them separately and composite. It takes longer on the front end but saves you from a group shot where two out of three products look compromised. For catalog work with dozens of similar mixed-material items, building one solid base lighting setup and adjusting only the local cards per product is far faster than reinventing the rig for every frame.
Picking a Background That Works With the Reflection, Not Against It
The background in reflective product photography is not neutral. It becomes part of the product’s surface the moment light bounces off it. A pure white sweep will reflect as a bright, even glow in a chrome surface, which is usually what you want for e-commerce. A textured or colored backdrop will reflect that texture and color right back at you, which can look intentional and premium or distracting and cheap depending on execution.
For straightforward e-commerce catalog work, a seamless white or light gray background keeps reflections predictable and consistent across hundreds of SKUs, which matters enormously for batch retouching. For hero or campaign images, a gradient background or a colored gel wash gives the product a reflected color story that a flat white background cannot deliver.
Matte surfaces underneath the product, rather than glossy ones, reduce the number of competing reflections you have to manage. A glossy acrylic base doubles your reflection problem by adding a mirror image below the product to the one already on its surface. That effect can look stunning for a hero shot and become a retouching headache for a 200-item catalog. Choose the trade-off deliberately, not by default. A starter background kit built around a few proven surfaces will save more retouching time than experimenting fresh on every shoot.
Creative Lighting Setups for Dramatic Reflections
Once you have the basics under control, reflective surfaces open up creative options that flat, matte products simply cannot offer. Colored gels on your backlight or rim light will show up as color washes inside glass and along metal edges, giving a perfume bottle or watch a mood a plain white catalog shot never will.
Multiple small point sources, rather than one large softbox, can be arranged to create a pattern of distinct highlights across a curved surface, useful for jewelry campaigns that want visible sparkle rather than a single smooth gradient. This is the opposite instinct from clean catalog work, and it only works because you are choosing the effect deliberately.
Reflecting a shaped object, a window frame, a logo cutout, into a bottle or chrome surface through careful light placement gives you a signature look without any post-production compositing. It takes patience to dial in, since even a slight camera shift changes what the surface reflects, but the payoff is an image that looks distinct from the thousand other reflective product shots in the same category. Save these setups for campaign hero images rather than full catalog runs. They rarely survive being replicated sixty times in an afternoon.
Staying Safe Around High-Output Studio Lighting
Reflective product setups often mean pushing more light output than usual, since diffusion panels and light cones eat several stops of intensity before it ever reaches the product. That translates into hotter modifiers, more powerful strobe packs, and more cabling on the floor than a typical portrait session.
Keep continuous LED panels, which run hotter than strobes for the same output, away from flammable materials like paper backdrops and foam core scraps, and never leave one running unattended at full power. Sandbag every light stand carrying a large softbox or diffusion panel, since the surface area that makes these modifiers useful also makes them catch air and tip over easily. Tape down cable runs, especially around a busy set with multiple assistants moving cards in and out. A tripped power cable near a hot light is a genuinely bad afternoon.
Give your eyes a break from staring directly into diffusion panels at close range for extended periods, and be cautious with any bare-bulb or open-face fixture near reflective surfaces, since a stray reflection can bounce more intensity back at your eyes than you would expect from the light’s rated output alone.
When to Book a Studio Day vs. Handle It Yourself
Hiring a pro makes sense at scale, for brand-critical shots, or with mixed materials and tight deadlines. Studios deliver consistent color and an experienced crew that most in-house teams cannot match. A shorter hybrid option, a single studio day or one rental block for your hero SKUs, often works better than an all-or-nothing choice.
— Ken
Ken Jones Photography for Product and E-Commerce Work
Ken Jones Photography is the alternative to piecing together your own lighting rig every time a new SKU comes in. Rather than renting gear, testing setups, and hoping the reflections cooperate before a launch deadline, you book a studio day and walk out with consistent, retouched files ready for your storefront.

Product and e-commerce shoots at Ken Jones Photography typically include full lighting setup, retouching, and delivery in standard e-commerce formats sized for your platform. The studio handles everything from a handful of hero SKUs to full catalog batches, with retouching handled in-house so you are not managing a separate vendor. If you run into scaling or booking questions on the business side, photography-specific SEO support can help turn a strong portfolio into more inbound bookings.
Browse the product and e-commerce gallery for finished examples, then request a quote or book a pre-production consult through Kenjonesnyc to talk through your specific SKUs before your next shoot day.
Primary Sources and Further Reading
For deeper technical grounding, review the law of reflection primer, the light cone breakdown, and practical glare-reduction workflow notes for hands-on setup guidance.
Sources
- Lighting angles & reflection photography — Visual Education
- Introducing the Light Cone — V-Flat World
- 5 handy lighting techniques using foam board — PetaPixel
FAQ
What Are the Three Types of Product Photography?
Most catalogs use packshot (clean, isolated product shots), lifestyle (product in context or in use), and detail or macro shots that highlight texture, materials, or features up close.
What Is the 20/60/20 Rule in Photography?
Definitions vary by studio, but a common version splits your visual content into hero or campaign imagery, standard catalog shots, and lifestyle or context imagery to balance a product line’s visual mix.
What Are Some Examples of Reflection Photography?
Common examples include a watch bezel catching a strip light, a perfume bottle backlit to show its outline, a car hood mirroring a studio ceiling, and jewelry wrapped in a light cone for an even, glowing gradient.
How Do You Take Product Photos Without Glare?
Use large diffused light sources instead of small hard ones, position black flags to cut unwanted highlights, and move the product or camera slightly rather than reducing your light output, since reflection problems are almost always geometry problems.
Should I Hire a Studio for Reflective Product Shoots?
For a handful of hero SKUs or a quick test, DIY lighting can work; for full catalogs, mixed materials, or tight deadlines, booking a studio session with an experienced crew usually saves more in retouch time than it costs.