

The most reliable approach to interview location sound is close miking, whether lavalier or boomed shotgun, combined with headphone monitoring, levels peaking between -12 and 0 dB, 60 seconds of room tone, and a second recorder running as backup. This routine reduces ambient noise, keeps dialogue intelligible, and saves hours in the edit bay later.
TL;DR:
- Choose a microphone based on framing and movement: a lav stays consistent through turns, a boom suits wider moving shots, and handhelds work for street interviews.
- When two microphones capture a voice, place the secondary at least three times farther away; a boom twelve inches away requires thirty-six inches of separation.
- Record 60 seconds of room tone with the interview microphone in place while everyone stays silent and still, helping editors smooth cuts and mask background shifts.
- Keep an authentic answer rolling through minor noise, such as a distant siren, but retake if a loud interruption hides an important word.
- Choose an omnidirectional lav when movement or clothing noise is a concern; use a cardioid in controlled rooms to reject more sound from other directions.
Table of Contents
- What to Bring: a Compact, Dependable Location Kit
- Practical Placement Rules and Distances That Actually Improve Clarity
- How to Handle a Boompole Without Adding Noise
- Choosing a Quiet Spot and Capturing Room Tone That Works
- Setting Levels, Monitoring, and Building in Redundancy
- A 90 Second Preflight and Roll Checklist
- On-Location Lessons From Real NYC Shoots
- When to Chase Perfect Audio and When to Keep Rolling
- Audio-Aware Interview Production From a Team That Treats Sound as Part of the Shot
- FAQ
- Sources
What to Bring: a Compact, Dependable Location Kit
We have shot executive interviews in conference rooms with HVAC roaring, on rooftops with wind gusting off the Hudson, and in retail spaces where the espresso machine behind the register never stopped hissing. In every case, the gear that mattered most was simple, well-maintained, and chosen for the specific framing and movement of that interview, not whatever happened to be charged in the bag.
A lavalier microphone clipped to the subject’s shirt gives consistent proximity regardless of how much they turn their head, which matters when a CEO gestures or leans forward mid-answer. A shotgun mic on a boompole gives an operator control over pickup without anything visible on camera, which matters for fashion-adjacent brand interviews where wardrobe needs to read clean. A handheld directional mic works for quick street-style interviews or run-and-gun setups where there is no time to rig a lav and no boom operator on the crew.
Beyond the microphones themselves, a dependable kit includes:
- A recorder or camera input with clean preamps and a line-in option for redundancy.
- Closed-back headphones for monitoring, since open-back designs leak sound and bleed into nearby mics.
- Foam or fur windscreens sized to the mic, plus a shock mount to isolate handling noise.
- Spare batteries (always more than you think you need) and extra SD cards.
- XLR cables, a TRS or USB adapter for camera-side connections, gaffer tape, small cable ties, and a soft blanket that can double as a sound baffle or a surface to rest gear on without clatter.
Choosing between lav, boom, and handheld comes down to shot size and how much the subject moves. A tight close-up with a still subject favors a lav, since it stays consistent and invisible. A wider two-shot with natural movement favors a boom, since the operator can follow the action without re-clipping anything. Street interviews or walk-and-talks favor a handheld, since there is no time for setup between subjects.
Power and connectors deserve attention before you ever leave the studio. Wireless lav systems burn through batteries faster in cold weather, which matters on an exterior NYC shoot in January. Phantom power requirements vary by mic, and not every camera or recorder supplies it reliably, so check your chain before you are standing on a sidewalk with a dead input.
Practical Placement Rules and Distances That Actually Improve Clarity
Placement decides more about your final audio than any plugin ever will. Shure’s guidance for conferencing and presentation audio makes the point plainly: minimizing distance to the source and selecting the right polar pattern does more for clarity than any setting on the recorder. Move the mic closer before you reach for a gain knob.
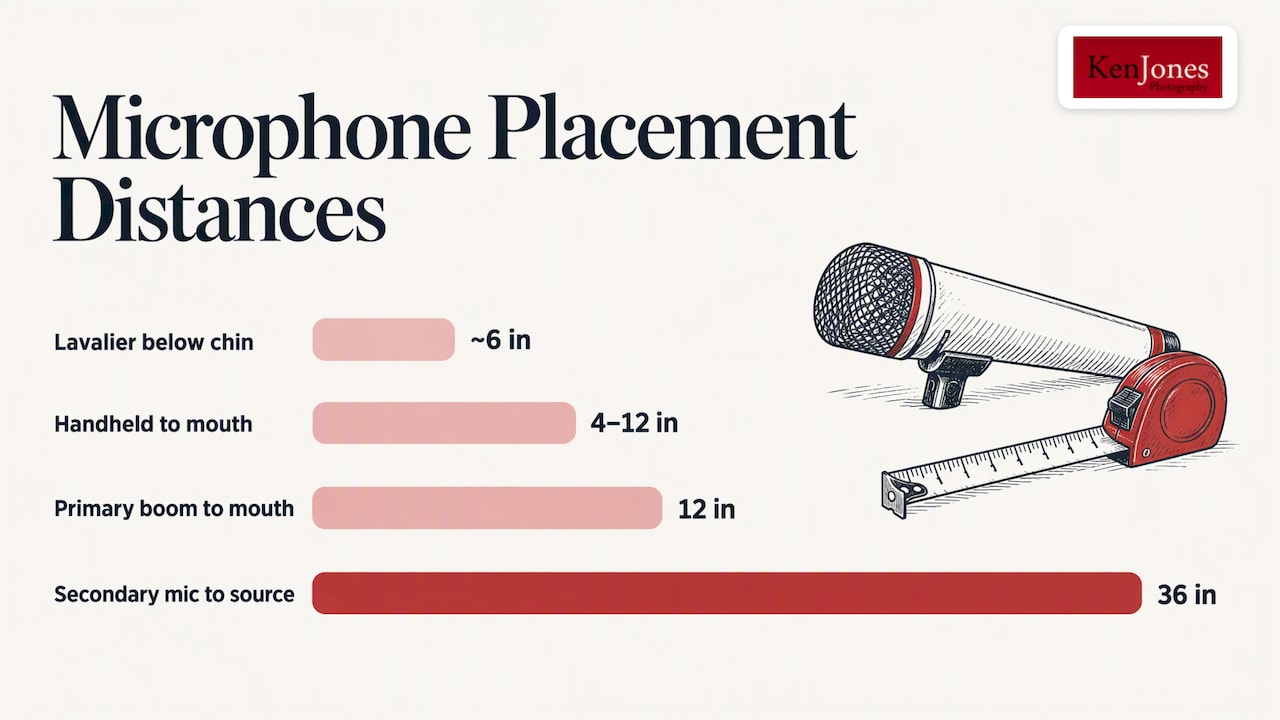
For a lavalier, clip it roughly six inches below the chin, near the top shirt button, with the capsule angled slightly upward toward the mouth. For a handheld or stand-mounted mic in a seated interview, four to twelve inches from the mouth gives a solid balance of proximity and natural tone. For a shotgun on a boom, get it as close as the frame allows, angled toward the nose at roughly a 45-degree angle, which keeps sibilance manageable while maximizing pickup.
When a shoot calls for more than one microphone active at once, say a boom overhead and a backup lav on the subject, the 3:1 rule keeps the signals from fighting each other. The secondary mic should sit at least three times farther from the sound source than the primary mic. If your boom is 12 inches from the subject’s mouth, a second mic picking up the same voice should sit no closer than 36 inches, or phase cancellation starts thinning out the tone and introducing a hollow, comb-filtered sound in the mix.
Target input peaks for most interview recordings should sit between -12 and 0 dB, and keeping average dialogue well below that ceiling leaves headroom for the inevitable laugh or raised voice mid-answer.
Polar pattern choice matters as much as distance. Cardioid lavs reject more off-axis noise, which helps in loud rooms, but they are more sensitive to clothing rustle and handling noise because they are more directional. Omnidirectional lavs are more forgiving of small movements and rustle, which is why they remain the default choice for most run-and-gun interview work, but they pick up more of the room around them. In a quiet, controlled space, we lean cardioid. On a noisy street corner or in a crowded venue, omni usually wins because clothing noise is more distracting on camera than a touch of ambient bleed.
Proximity effect, the bass boost that happens when a directional mic gets very close to a sound source, can thicken a voice nicely on a boom but can also make a lav sound boomy if it is clipped too close to the chest. A quick check in headphones before rolling catches this in seconds.
A few placement habits worth building into every setup:
- Angle the lav capsule slightly upward rather than flat against the chest to avoid muffled, bassy tone.
- Keep ties, lanyards, and necklaces away from the lav cable to prevent rattle.
- Test the boom angle while the subject speaks a full sentence, not just a single word, since sibilance shows up more on longer phrases.
How to Handle a Boompole Without Adding Noise
A boompole is a simple tool, but sloppy handling introduces more unwanted noise into an interview than almost anything else on set. We have watched plenty of capable operators fight their own gear because nobody showed them the basics early on.
- Grip the pole with your support hand steady and mostly vertical, letting your rear hand do the steering and angle adjustments.
- Dip the mic overhead and toward the subject’s mouth rather than pushing it straight out, which keeps the capsule angled correctly without entering frame.
- Extend the pole sections fully, then back off slightly before locking the collar, since overtightening strains the threads and makes quick length changes harder mid-shoot.
- Wrap the XLR cable loosely around the pole in a few spiral loops to prevent it from swinging or slapping against the shaft.
- Mark the windscreen with a small strip of tape visible to the camera operator, so they can call out when the mic edges into frame.
Audio-Technica’s boompole technique guidance echoes this approach: overhead positioning, proper shock mount prep, and deliberate cable management reduce both ambient pickup and handling noise while extending the operator’s effective reach.
Pro Tip: Rest the boom’s weight against your shoulder or hip during a long static take instead of holding it at full extension the entire time; your arms will thank you and the mic will stay steadier.
For two speakers in conversation, a slight off-axis angle on the boom, favoring whichever speaker is quieter, helps balance levels without constant gain riding. On longer back-and-forth exchanges, it is often cleaner to rig two lavs rather than swing one boom between speakers, since every swing risks a bump, a breath, or a moment of off-mic dialogue right when someone says something you need.
Choosing a Quiet Spot and Capturing Room Tone That Works
Before any mic goes on a subject, walk the location like you are hunting for problems, because you are. Check for windows facing busy streets, HVAC vents that cycle on without warning, refrigerators that hum louder than they look like they should, and reflective surfaces like glass or bare walls that bounce sound back into the room.
A few fixes solve most of these problems without renting a single piece of treatment gear:
- Position the subject with their back to a wall rather than facing an open window, since glass reflects sound and street noise travels straight through.
- Lay down a rug or furniture blanket on hard floors to cut reflections and footstep noise from crew movement.
- Ask building occupants to silence phones, pause nearby meetings, or hold off on using an espresso machine down the hall for fifteen minutes.
- Schedule around predictable noise windows, like elevator traffic at the top of the hour or a loading dock delivery schedule.
- Introduce soft furnishings such as couch cushions or a thick curtain nearby to absorb some of the room’s natural ring.
The Library of Congress’s fieldwork guidance recommends the same basic instinct: avoid rooms with windows onto busy streets or appliances nearby, and favor soft-furnished corners whenever one is available.
Room tone is the ambient fingerprint of a specific location, and recording about 60 seconds of it with the same mic placement gives an editor a clean fill to smooth cuts and mask background pops later. Skipping it is one of the more common ways a location shoot creates headaches it did not need to create.
Capture room tone with everyone standing still and silent, same mic position as during the interview, right after the last question or before the first. The most frequent mistakes are subtle: someone shifts their weight, a breath gets picked up, a chair creaks, or a car horn sounds in the distance. None of those ruin a take on their own, but they make the room tone useless for the one edit where you actually need it.
Setting Levels, Monitoring, and Building in Redundancy
Levels and monitoring discipline separate usable interview audio from a frustrating scramble in post. Set your input gain so peaks sit comfortably between -12 and 0 dB, with average dialogue running lower than that ceiling to leave room for an unexpected laugh or a raised voice.
Wearing closed-back headphones during the entire recording, not just during setup, is non-negotiable on a professional shoot. A quick soundcheck before rolling, where you ask the subject to speak in full sentences rather than a flat test count, reveals rustle, wind noise, or distortion that a glance at a meter alone will miss.
Backup recording is cheap insurance against an expensive problem. Running a second device, whether a dedicated backup recorder or a phone-based recording app, protects the interview if a cable fails, a card corrupts, or a battery dies mid-answer. A timecode slate, even a simple clap and verbal announcement, saves real time syncing multiple sources later.
Before any serious take, confirm:
- Headphones are on and the operator is actively listening, not just watching the meter.
- A second recording device is rolling independently of the primary.
- Batteries show enough charge for the full expected session, plus a margin.
- Storage cards have enough free space for the planned run time, with room to spare.
For readers recording sensitive interviews on a phone as a backup, a privacy-focused on-device recording routine keeps transcripts local rather than routed through a cloud service, which matters for subjects discussing confidential business matters.
A 90 Second Preflight and Roll Checklist
A short, consistent preflight before every take catches the problems that otherwise surface during the edit, when fixing them costs far more time.
- Confirm consent and any recording permissions with the subject and location.
- Check batteries and card space across every device in the chain.
- Rig the microphone, whether lav, boom, or handheld, and double check placement.
- Confirm camera framing shows no mic in shot and the boom operator has clearance to move.
- Set and verify levels against the meter, targeting peaks in the safe range.
- Record 60 seconds of room tone with everyone silent and still.
- Start the backup recorder or app before the primary device.
- Announce slate information verbally, including subject name and take number.
On a small crew, the camera operator typically owns framing and the mic-in-shot check, the interviewer owns consent and subject comfort, and an assistant or producer owns batteries, cards, and backups. On solo shoots, running this list out loud, even quietly to yourself, prevents the most common failure: forgetting to start the backup recorder before rolling.
| Common mistake | One-sentence fix |
|---|---|
| Backup recorder never started | Start backups before the primary device every single take |
| Meters clipping on loud answers | Lower gain until average dialogue sits well under peak |
| No room tone recorded | Grab 60 seconds immediately after the last question |
| Mic visible in frame | Have the camera operator confirm clearance before every take |
For multi-camera interview setups specifically, a 30 second preflight checklist built for coordinating multiple angles at once helps keep audio consistent across cameras that may be rigged differently.
On-Location Lessons From Real NYC Shoots
A recent executive interview setup put these habits to the test. The office sat on a noisy, street-facing floor in Lower Manhattan, with traffic and occasional sirens bleeding through single-pane windows and an HVAC unit that cycled every few minutes. Moving the subject’s chair away from the window and angling it toward an interior wall cut a meaningful amount of the street noise before a single microphone went on.
For that setup, a lav won out over a boom. The executive gestured often and turned to address a second interviewer off camera, and keeping a boom accurately aimed through that kind of movement would have meant constant level adjustments. A cardioid lav, clipped carefully to minimize clothing rustle against a structured blazer, held steady and consistent through the entire session.
Three habits came out of that shoot that we apply on nearly every interview now:
- Prioritize subject comfort first, since a relaxed subject gives better sound and a better performance than a technically perfect rig on a stiff, distracted speaker.
- Communicate the plan before rolling, telling the subject what to expect and why you are asking them to sit a certain way, so adjustments do not feel disruptive mid-interview.
- Layer backups wherever possible, because the take you cannot get back is always the one you needed most.
Readers planning a similar setup can look at how we approach corporate interview video production or review examples of location-based work through our broader production archives.
When to Chase Perfect Audio and When to Keep Rolling
Technical perfection and a genuine human moment do not always arrive together, and knowing which one to protect is a judgment call every interview eventually forces.
If a subject gives an unexpectedly honest, unscripted answer and a car horn clips the last word, we almost never stop to re-run it. A slightly imperfect but authentic take edits better than a technically clean answer that sounds rehearsed the second time around. Room tone and a careful edit can smooth most minor intrusions anyway.
Two quick heuristics guide that call on set. First, ask whether the noise obscures meaning or just adds texture. A distant siren is texture. A slammed door over a key sentence is a problem worth a retake. Second, ask whether re-running the question will get a better answer or just a flatter one. Subjects rarely repeat a spontaneous reaction with the same energy, so sometimes the smarter move is to keep rolling and fix what you can later.
— Ken
Audio-Aware Interview Production From a Team That Treats Sound as Part of the Shot
We build interview video production around the same discipline covered here: close miking suited to the setup, monitored levels, room tone captured on every location, and backup recording running throughout. For corporate clients planning executive interviews, panel discussions, or branded video content, that preparation means fewer surprises in the edit and a cleaner finished piece.

Our corporate interview video production work covers both studio and on-location shoots across Manhattan and the surrounding area, with crews who handle lighting, framing, and audio as one coordinated setup rather than separate problems solved on the fly. If your team is planning a location interview and wants a crew that treats sound as seriously as the picture, reach out through Kenjonesnyc to talk through your project and get a production estimate scoped to your location, subject count, and deliverables.
FAQ
What is the best microphone for street interviews?
A handheld directional microphone is generally the most practical choice for street interviews, since it lets the interviewer control proximity quickly between subjects without rigging a lav each time. Cardioid handheld mics also reject more traffic and crowd noise than omnidirectional options in loud outdoor settings.
What is location sound recording?
Location sound recording means capturing dialogue and ambient audio on an actual filming location rather than in a controlled studio booth. It involves selecting microphones, placement, and monitoring techniques suited to whatever noise and acoustic challenges that specific space presents.
What is the 3:1 rule for microphones?
The 3:1 rule states that when two microphones pick up the same sound source, the second mic should be positioned at least three times farther from that source than the primary mic. Following this distance ratio helps prevent phase cancellation, which otherwise produces a thin, hollow tone when the two signals combine.
How do I record clean audio on location without a sound mixer?
Close mic placement, whether a lav six inches below the chin or a boom angled near the mouth, does more for clarity than any setting on a recorder, according to Shure’s audio systems guidance. Monitoring through closed-back headphones while setting peaks between -12 and 0 dB lets one operator manage levels without a dedicated mixer.
Why does an editor need room tone from an interview location?
Editors use about 60 seconds of clean room tone recorded with the same mic placement as the interview to fill gaps between cuts and mask abrupt background changes. Without it, edited dialogue can sound noticeably stitched together whenever the ambient noise shifts between takes.
Sources
- OHDA audio glossary (metering guidance)
- Shure — audio systems guide (conferencing/presentation)
- Audio-Technica — Basic audio techniques for video: boompole use
- Frame.io — Room tone guide