
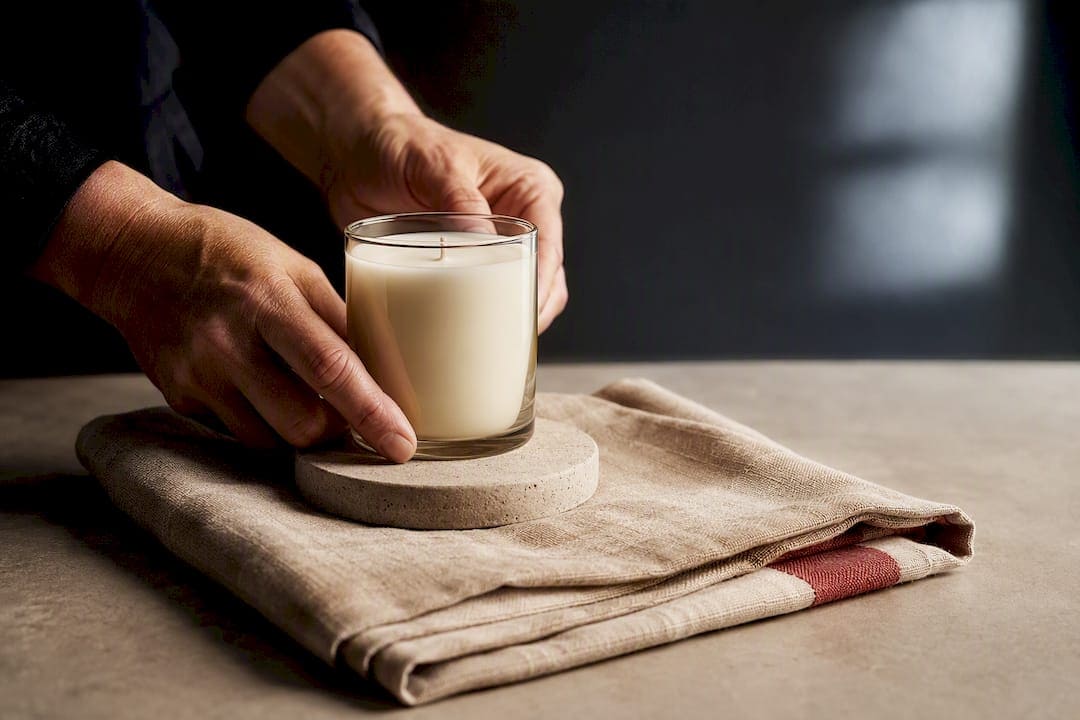
Start with five things: a neutral backdrop, a riser or plinth, one texture prop, a scale reference, and a roll of blutack. That combination handles most of what a small brand or Etsy seller needs to shoot a product that looks intentional rather than snapped on a kitchen counter. Product styling props are simply the objects you place around a hero product to show scale, context, and quality without stealing attention from the thing you’re actually selling. Buy those five items before anything fancier, and read on for the full kit.
TL;DR:
- Reusing a small, consistent set of two surface types and three prop categories ensures better catalog cohesion than constantly sourcing new props.
- Material and finish choice are crucial; matte surfaces provide soft light, while glossy ones can cause unwanted reflections that are difficult to fix in post-production.
- Testing new props under your actual studio lighting and documenting your setup can prevent costly reshoots and ensure color consistency across collections.
- Buying secondhand, thrifted, or vintage props adds authenticity and character, often outperforming mass-produced, plastic kits both visually and environmentally.
- Once product volume grows or high-quality campaign images are required, hiring a professional studio with a curated prop library often results in higher-quality images with fewer reshoots.
Table of Contents
- What Product Styling Props Are and Why They Matter
- The Essential Prop Kit: What to Buy by Budget
- How to Choose Props: Material, Scale, and a Buying Checklist
- Where to Buy Props: Marketplaces, Prop Shops, and Thrift Finds
- Styling Techniques: Hierarchy, Imperfection, and Common Mistakes
- Caring for Your Props Between Shoots
- Kit Checklist and Budget Plan
- Studio-Proven Tips: Lessons From Real Shoots
- Safety Considerations for Breakable and Food Props
- Sustainable and Environmentally Conscious Prop Sourcing
- What the Research Actually Supports
- A Practical Alternative: Let a Studio Handle the Props
- Sources
- FAQ
What Product Styling Props Are and Why They Matter
Product styling is the act of arranging your hero item with a small number of supporting objects to tell a quick visual story. It communicates use, scale, and mood in the two or three seconds a shopper spends scanning a listing photo. The AcquireConvert styling guide puts it plainly: styling should help shoppers picture owning the product, add context, clarify scale, and reinforce how the brand positions itself, all while keeping the product visually dominant with usually just one to three supporting elements.
That last part trips up a lot of new sellers. I’ve walked into more than one home studio where someone has piled six props around a candle, a linen napkin, dried eucalyptus, a wood board, a book, and a coffee cup, and the candle disappears into the clutter. The eye doesn’t know where to land. Cut it down to two elements and the candle becomes the obvious subject again.
Not every shot needs props at all. A clean, prop-free hero image on a pure white background is still mandatory for most marketplaces, and it remains the fastest-loading, most universally usable asset in your catalog. According to Tov Studio Photo’s ecommerce workflow breakdown, a professional product gallery typically needs four categories of image: a white-background hero, a scale shot, a detail close-up, and a lifestyle image. Props belong in the last two categories, not the first.
Here’s roughly how I’d map props to purpose:
- White-background hero: no props, just the product and clean light.
- Scale shot: one demonstrative object (a hand, a coin, a familiar item) so buyers judge size correctly.
- Detail shot: maybe a texture prop underneath to add warmth without competing.
- Lifestyle shot: two to three props that build a believable scene, tied to one clear story.
Props also do quiet psychological work. A ceramic mug photographed on a marble slab reads as more expensive than the same mug on a paper towel. A skincare bottle next to a linen towel and a single dried stem reads as spa quality. None of that changes the product. It changes what the buyer assumes about the product, and that assumption is worth real money on a product page.
The Essential Prop Kit: What to Buy by Budget
Before you spend a dollar, sort your shopping list into six categories: backdrops, risers or plinths, texture layers, natural elements, scale props, and fixings or tools. Every prop you’ll ever buy falls into one of those buckets, and most beginners overspend on the wrong one first (usually backdrops, when risers and fixings actually unlock more shots per dollar).
Prioritize repeatability and condition over novelty. A slightly boring beige backdrop you can use in fifty shoots beats a striking marble-print vinyl you’ll use twice and then find doesn’t match your new packaging. Buy pieces that are neutral enough to disappear behind different products, and check condition obsessively, since a scuffed riser or a stained linen shows up on camera far more than it does in person.
| Kit tier | Core items | Typical price / budget | Material and finish | Portability / storage | Durability / reusability |
|---|---|---|---|---|---|
| Starter | Foam core backdrop, 2 wood risers, 1 linen napkin, blutack, tape measure | $30 to $60 | Foam board, raw or painted wood, cotton linen | Flat storage, fits in a closet shelf | Foam core wears fast; wood risers last year |
A starter kit needs almost nothing exotic. One foam core sheet in white or warm gray, two or three wooden risers of different heights, a single linen napkin for texture, a roll of blutack, and a cheap tape measure will carry a new Etsy shop through its first hundred listings. The intermediate tier adds color options and a couple of higher-end surfaces so your catalog doesn’t look identical shoot after shoot. Studio-level kits bring in real stone, curated vintage pieces, and professional fixing tools, the kind of gear that earns its cost back once you’re shooting dozens of SKUs a month.
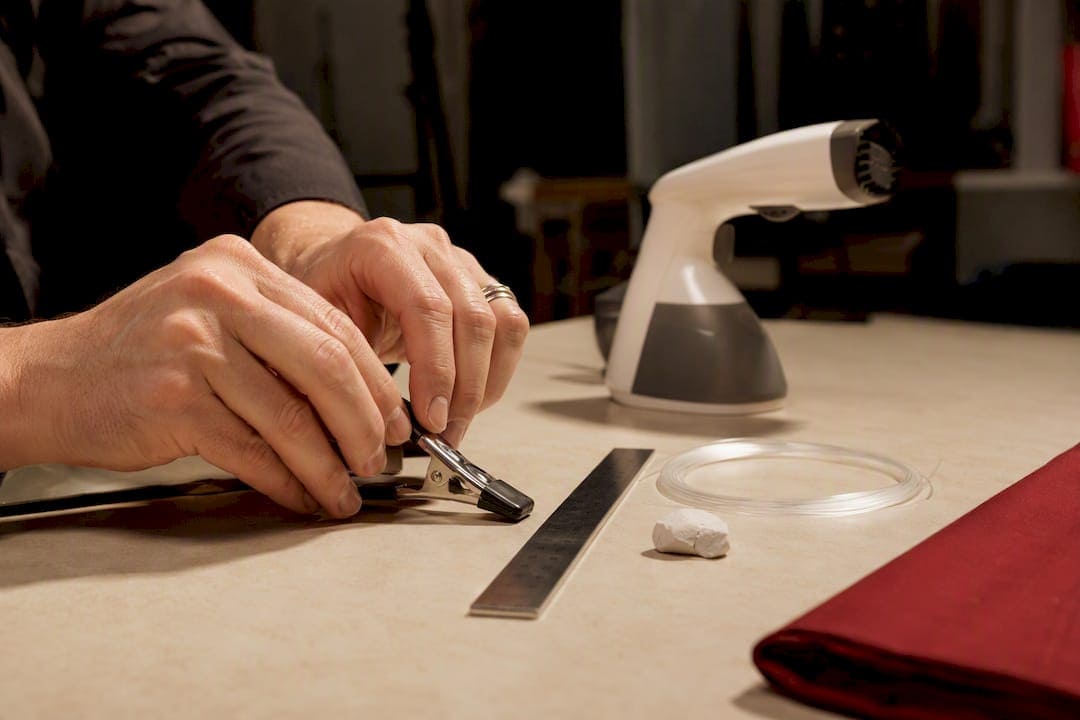
One category deserves its own line: fixings and small tools. Blutack or white tac, fishing line for suspending objects, sticky hooks, clamps, a ruler, and a compact fabric steamer are the unglamorous items that actually make a shoot run smoothly, according to Creatively Squared’s prop styling toolkit breakdown. I’ve seen more shoots saved by a $6 clamp than by any prop that cost over $50.
How to Choose Props: Material, Scale, and a Buying Checklist
Material choice decides more of your final image quality than most beginners expect. Matte surfaces on textiles, stone, and painted wood keep light soft and even, while glossy plastic or lacquered surfaces throw hot spots and reflections straight into your lens, according to Adobe’s product photography props guide. If a prop looks shiny under store lighting, assume it will look worse under a softbox.
Color discipline matters just as much. Keep your palette to two or three tones per shot, and make sure none of them compete in saturation with your product’s packaging. A bright red bottle on a bright red backdrop is a rookie mistake I still see from sellers who picked props for how they look alone on a shelf, not next to the actual product.
Scale is where product photography quietly loses or wins sales. Buyers routinely misjudge size from a photo alone, which is a leading driver of returns for small goods like jewelry and cosmetics. Placing a coin, a hand, or a familiar object like a pencil next to the product gives an instant, reliable size reference, according to PhotoRoom’s breakdown of ecommerce photography types. Keep the same scale reference across a product line so every listing reads consistently.
Before you check out on any prop purchase, run this list:
- Confirm real dimensions, not just the thumbnail image, especially for risers and plinths where a few inches off changes your whole composition.
- Check the return policy before buying anything you can’t inspect first, particularly vintage or handmade pieces with no standard sizing.
- Inspect condition photos closely for chips, stains, or warping that listing photos tend to hide in shadow.
- Check shipping time against your shoot date, since marketplace props can take a week or more, and a delayed prop can stall a whole production day.
- Buy one, test it, then scale up rather than ordering five colors of the same backdrop before you know which one actually photographs well under your lights.
Pro Tip: Test any new prop under your actual shoot lighting before you commit to buying a matching set. A backdrop that looks perfectly neutral on your phone screen can pick up a warm or cool cast under studio lights that throws off your product’s true color, and that’s a problem no amount of retouching fully fixes.
Where to Buy Props: Marketplaces, Prop Shops, and Thrift Finds
Amazon (various prop kits and individual props) is the fastest way to get a starter kit into your hands, and the sheer volume of sellers means you can find a backdrop, riser, or full prop kit shipped within a day or two almost anywhere in the country. The tradeoff is quality control. Mass-market prop kits vary wildly, and many of them lean toward that unmistakable “plastic kit” look that reads cheap on camera even when the price wasn’t, according to the Amazon photo props search results themselves.
Prop Club / Prop Shop (specialist prop retailers) sit a step up from general marketplaces. These are retailers built specifically around photography props and risers, with curated selections instead of an endless undifferentiated scroll. You pay more per item, but you’re buying pieces that were chosen by people who shoot for a living, and the shapes and finishes tend to hold up better under studio light.
Etsy (handmade & vintage props) is where character comes from. One-off ceramic dishes, vintage trays, hand-thrown bowls with slight imperfections, these give a shot personality that a mass-produced kit can’t replicate, and they’re often the cheapest route to a prop that looks genuinely unique to your brand.
Then there’s the option most beginners skip entirely: your own house, a thrift store, or a friend’s kitchen cabinet. Veteran stylists frequently prefer thrifted, household, or curated finds over cheap prop kits, because real materials in good condition simply read better on camera than manufactured plastic stand ins, according to AcquireConvert’s catalog photography notes. Before buying anything, walk through your own home first:
- A linen napkin or tea towel you already own often beats a $15 “styling cloth” from a prop kit.
- A stack of hardcover books photographs better than most fake “book prop” risers.
- A cutting board, a ceramic mug, or a wooden bowl from your kitchen can double as a riser or texture layer for free.
- Thrift stores are a reliable, inexpensive source for trays, small dishes, and vintage tins that add instant character.
Styling Techniques: Hierarchy, Imperfection, and Common Mistakes
Every styled shot needs a decision made before you touch a single prop: what’s first, second, and third in the frame. The product is always first. A supporting prop that reinforces scale or use is second. A texture or color accent is third, and if you find yourself reaching for a fourth element, that’s usually a sign to pull one back out instead.
Perfect symmetry is the enemy of a believable shot. Slight overlaps, an object cropped at the frame’s edge, a backdrop crease left visible on purpose, these small imperfections make a scene feel like a real moment rather than a staged diorama, an approach Fstoppers has written about at length. I tell new shooters to nudge everything off-center by hand after they’ve set up the “perfect” arrangement. It almost always improves the shot.
Lighting behaves differently depending on what your props are made of. Fabric and stone hold soft light beautifully and rarely cause problems. Glass, glossy ceramics, and metal are a different story: angle your key light so it doesn’t bounce straight back into the lens, and if a reflection still shows up, a small diffusion panel or a slight change in camera angle usually solves it faster than fighting it in post.
Before calling a setup finished, run three quick tests:
- Shrink the image to thumbnail size on your phone and check whether the product still reads clearly at that size, since that’s how most shoppers will actually see it first.
- Confirm any label or logo is legible and not obscured by a prop’s shadow or edge.
- Do a scale sanity check by asking someone unfamiliar with the product to guess its size from the photo alone.
A repeatable system built around two fixed surfaces, two or three prop families, and one consistent lighting setup does more for a catalog’s cohesion than any single “hero” prop purchase, a point backed by ProductAI’s staging guide. Chasing a different aesthetic for every product is the single most common mistake I see from sellers scaling past their first twenty listings.
Caring for Your Props Between Shoots
A prop library only earns its cost if it’s still usable six months from now. Linens wrinkle in storage, so a small handheld steamer before every shoot keeps them shoot-ready in minutes. Acrylic risers scratch easily, so wipe them with a microfiber cloth rather than paper towels, which leave fine scuffs over time. Painted wood plinths chip at the corners fastest; keep a small pot of matching touch-up paint on hand rather than replacing the whole piece.
Storage matters more than most sellers plan for upfront:
- Label bins by category (backdrops, risers, textiles, small props) so you’re not digging through everything before a shoot.
- Store risers stacked by height in a single box to avoid warping or scratching each other.
- Roll fabric backdrops instead of folding them to avoid permanent crease lines.
- Keep a small continuity notebook or spreadsheet noting which surface, camera distance, and negative space you used per product line, so a reshoot months later matches the original set exactly.
Kit Checklist and Budget Plan
Build your kit in stages rather than buying everything at once. Start with the cheap, high-repeat items, then add character pieces once you know what your catalog actually needs.
- Starter ($30 to $60): foam core backdrop, two wood risers, one linen napkin, blutack, tape measure.
- Intermediate ($80 to $180 added): two vinyl backdrop colors, an acrylic riser set, one ceramic dish, dried botanicals, a compact steamer.
- Studio upgrade ($250 and up added): real stone or marble slabs, a plinth set in three or four heights, curated vintage pieces, a professional steamer, a small clamp kit.
| Stage | What to buy | Why this order |
|---|---|---|
| 1. Starter | Backdrop, risers, one texture prop, fixings | Covers the majority of listing photos immediately |
| 2. Intermediate | Color variety, acrylic riser set, steamer | Adds visual range without losing consistency |
| 3. Studio | Stone surfaces, plinth set, curated vintage | Elevates hero and campaign images once volume justifies it |
Buy in that order. Skipping straight to marble slabs before you own a decent riser and a working steamer is the single most common overspend I see from small brands setting up their first real kit.
Studio-Proven Tips: Lessons From Real Shoots
A candle brand once came to a shoot with a beautiful hand-carved wood tray they’d bought specifically as their signature prop. Under our studio lights, the wood’s grain threw warm reflections straight onto the candle’s glass jar, making it look like the wax had a strange orange tint. We swapped the tray for a piece of matte linen for thirty seconds, and the color problem disappeared entirely. The lesson wasn’t that the tray was a bad prop. It was that nobody had tested it under actual studio lighting before the shoot day, and that’s a mistake that costs real time when a client is on the clock.
Every repeat client gets a continuity note on file. It’s nothing fancy, just a short record kept per product line:
Surface: warm gray foam core, matte side up.
Camera distance: 24 inches from lens to product center.
Key light angle: 45 degrees camera left, diffused.
Negative space: top third reserved for ad text overlay.
That single paragraph, filed per SKU, has saved more reshoots than any piece of gear in the studio. When a brand comes back eight months later needing three new products shot to match the old catalog, that note means the new images slot in seamlessly instead of looking like they came from a different studio entirely.
Pro Tip: Photograph your prop setup itself, not just the final shot, before you break it down. A quick overhead phone photo of the whole arrangement, lights included, is worth more than any written note when you need to rebuild the exact same look next season.
If you’re shooting one or two SKUs a month and have the patience to test lighting yourself, DIY makes sense. Once you’re managing a growing catalog, launching a campaign hero image, or dealing with premium packaging that punishes every visible flaw, that’s usually the point where bringing in a professional pays for itself in fewer reshoots.
Safety Considerations for Breakable and Food Props
Glass, ceramics, and stone slabs are the props most likely to cause an actual injury or a ruined product on set, and a little planning avoids both. Always support heavy stone or marble slabs from underneath rather than propping them at an angle against a stand, since a slipped slab can crack a product or a lens in an instant. Keep breakable props away from table edges when you’re not actively shooting them, and never stack risers higher than they’re rated to hold, especially acrylic pieces, which can bow and snap under uneven weight.
Food-based props carry a different set of risks. Anything perishable, fresh produce, dairy, raw meat, needs to be swapped out and refrigerated between takes, since studio lighting generates real heat and food styled for more than twenty or thirty minutes under hot lights starts to look, and in some cases genuinely become, unsafe. If a shoot involves food that will later be eaten or given away, keep raw and cooked items on separate surfaces, and never reuse a prop that touched raw meat or eggs for anything else that day.
Sharp-edged props, glass jars, cut produce, metal tools, deserve the same caution a kitchen would give them. Keep a small first aid kit in your studio bag. It sounds excessive until the one time someone nicks a finger on a glass edge mid shoot, and it’s the difference between a two-minute pause and a scramble.
Sustainable and Environmentally Conscious Prop Sourcing
Buying secondhand isn’t just a budget move, it’s the lowest-impact way to build a prop kit. Thrift stores, estate sales, and Etsy’s vintage sellers keep usable ceramics, trays, and textiles out of landfills while giving your shots more character than anything mass-produced. A chipped vintage bowl that would never sell as a kitchen item photographs beautifully as a styling prop, since the camera rarely sees a hairline flaw that matters at arm’s length.

Natural elements, dried botanicals, stone, raw wood, are inherently more sustainable than plastic prop kits, and they tend to photograph better too, since real materials hold light more convincingly than synthetic stand ins. Buying dried rather than fresh botanicals also means you’re not replacing wilted stems every few weeks, which keeps both your footprint and your recurring costs down.
When you do buy new, favor durable materials over disposable ones. A solid wood riser or a real stone slab will outlast a dozen prop kit purchases, which makes it the more sustainable choice even at a higher upfront price. Painted MDF plinths, when properly cared for with the touch-up paint approach mentioned earlier, can last years rather than getting tossed after one chipped corner. The most sustainable prop kit is often simply the smallest one, since a tight, repeatable set of two surfaces and a few prop families gets more use out of every item than an overflowing bin of props bought on impulse and used once.
What the Research Actually Supports
Most advice on this topic treats prop shopping like a checklist problem: buy these ten items and you’re set. That’s backwards. The research and every shoot I’ve run points the other way, toward restraint. Keep the product dominant, use one to three supporting elements, and build a small repeatable system rather than a growing pile of one-off purchases.
The conventional advice oversells novelty. New sellers chase the “wow” prop, the marble slab, the vintage brass tray, before they own a decent backdrop or a working steamer. That’s the wrong order. Repeatability wins more sales than any single striking prop, because a consistent catalog builds trust faster than one beautiful outlier photo surrounded by inconsistent ones.
If I had to name the single biggest priority for a beginner, it’s this: buy fewer props, test them under real light before committing to a full set, and write down your setup the moment you land on something that works. The gear matters less than the discipline of using it the same way twice.
— Ken
A Practical Alternative: Let a Studio Handle the Props
Building a prop kit yourself makes sense for a handful of SKUs a month. Once you’re managing a growing catalog, launching a campaign, or need hero images that have to look flawless the first time, buying and storing your own props stops being the efficient option. An alternative to assembling a personal prop closet is to work with a studio that owns a curated prop library and knows how each surface behaves under real lighting.

Some studios offer full styling and production support for product and ecommerce shoots, including prop selection, studio rental, lighting, and retouching, so a brand can go from raw product to a finished, consistent catalog without buying a single riser. Recent work in the ecommerce and product gallery shows the range of styled hero and lifestyle images that come out of that process. If your catalog has outgrown a home setup, or you need campaign-ready hero images that can’t afford a lighting mistake, get in touch through the product photography services page to check availability for your next shoot.
Sources
For deeper reading on the ideas covered here, AcquireConvert’s product styling guide covers the “keep it to 1–3 elements” rule in more depth, and Tov Studio Photo’s ecommerce workflow guide walks through the four-image gallery structure most marketplaces expect. Creatively Squared’s prop styling toolkit article is worth bookmarking for the small fixing tools that rarely get mentioned elsewhere. For the brand side of this equation, BabyLoveGrowth’s piece on brand consistency explains why a repeatable prop system pays off well beyond the photo itself.
- E-Commerce Product Photography Workflow Guide (2026) – Tov Studio Photo
- Essential items for your prop styling toolkit — Creatively Squared
- Photo Props For Product Photography — Amazon search results
FAQ
What Are Product Styling Props Exactly?
Product styling props are the backdrops, risers, textures, and supporting objects placed around a hero product to show scale, context, and quality, always keeping the product itself visually dominant.
Do I Need Different Props for Every Product Type?
No. A small, repeatable set of two surfaces and two or three prop families, reused with slight variation, builds a more consistent catalog than buying new props for every product.
Is It Better to Buy a Prop Kit or Source Individually?
Prop kits from marketplaces like Amazon get you started fast, but individually sourced pieces from Etsy, prop shops, or thrift stores usually photograph better and avoid the generic “kit” look.
How Many Props Should Be in One Shot?
Usually one to three supporting elements alongside the product, based on styling guidance from AcquireConvert; more than that tends to compete with the product for attention.
When Should I Hire a Professional Instead of DIY Styling?
Once you’re shooting a growing catalog, launching a campaign hero image, or need premium presentation with no room for lighting mistakes, working with a studio like Ken Jones Photography usually saves more time and money than building out a full prop kit yourself.